![[Do it! 안드로이드 앱 프로그래밍 #14] 상단 탭과 하단 탭 만들기](https://img1.daumcdn.net/thumb/R750x0/?scode=mtistory2&fname=https%3A%2F%2Fblog.kakaocdn.net%2Fdn%2FoYDXa%2FbtrnJcdcABy%2FMUiB2UxlPVOSofAW0cbdFk%2Fimg.png)
14 상단 탭과 하단 탭 만들기
하나의 뷰에서 여러 개의 정보를 볼 때 일반적으로 사용하는 뷰로 탭(Tab)을 들 수 있다. 탭은 네비게이션(Navigation) 위젯이라고 불리기도 하며 상단 탭과 하단 탭(Bottom Navigation)으로 구분할 수 있다. 최근에는 하단 탭을 더 많이 사용한다.
14-1 상단 탭 보여주기
세 개의 상단 탭을 보여주기 위해서 화면은 총 4개가 필요하다. 하나는 메인 액티비티를 보여주기 위한 화면이고, 나머지 세 개는 각각의 탭 화면이다. 그렇다면 메인 액티비티의 XML 파일에는 상단 탭의 레이아웃과, 화면을 보여줄 레이아웃이 필요하다.
▼ 상단 탭 레이아웃과 화면을 보여줄 프레임 레이아웃 추가하기
<?xml version="1.0" encoding="utf-8"?>
<RelativeLayout xmlns:android="http://schemas.android.com/apk/res/android"
    xmlns:app="http://schemas.android.com/apk/res-auto"
    xmlns:tools="http://schemas.android.com/tools"
    android:layout_width="match_parent"
    android:layout_height="match_parent"
    tools:context=".MainActivity">

    <androidx.coordinatorlayout.widget.CoordinatorLayout
        android:layout_width="match_parent"
        android:layout_height="match_parent">

        <com.google.android.material.appbar.AppBarLayout
            android:layout_width="match_parent"
            android:layout_height="wrap_content"
            android:theme="@style/ThemeOverlay.AppCompat.Dark.ActionBar">

            <androidx.appcompat.widget.Toolbar
                android:id="@+id/toolbar"
                android:layout_width="match_parent"
                android:layout_height="wrap_content"
                android:background="?colorPrimaryDark"
                android:elevation="1dp"
                android:theme="@style/ThemeOverlay.AppCompat.Dark">

                <TextView
                    android:id="@+id/titleText"
                    android:layout_width="wrap_content"
                    android:layout_height="wrap_content"
                    android:text="타이틀"
                    android:textAppearance="@style/Base.TextAppearance.Widget.AppCompat.Toolbar.Title"/>

            </androidx.appcompat.widget.Toolbar>

            <com.google.android.material.tabs.TabLayout
                android:id="@+id/tabs"
                android:layout_width="match_parent"
                android:layout_height="wrap_content"
                android:elevation="1dp"
                app:tabGravity="fill"
                app:tabMode="fixed"
                app:tabSelectedTextColor="?colorAccent"
                app:tabTextColor="?colorPrimary" />

        </com.google.android.material.appbar.AppBarLayout>

        <FrameLayout
            android:id="@+id/container"
            android:layout_width="match_parent"
            android:layout_height="match_parent"
            app:layout_behavior="@string/appbar_scrolling_view_behavior">

        </FrameLayout>

    </androidx.coordinatorlayout.widget.CoordinatorLayout>

</RelativeLayout>
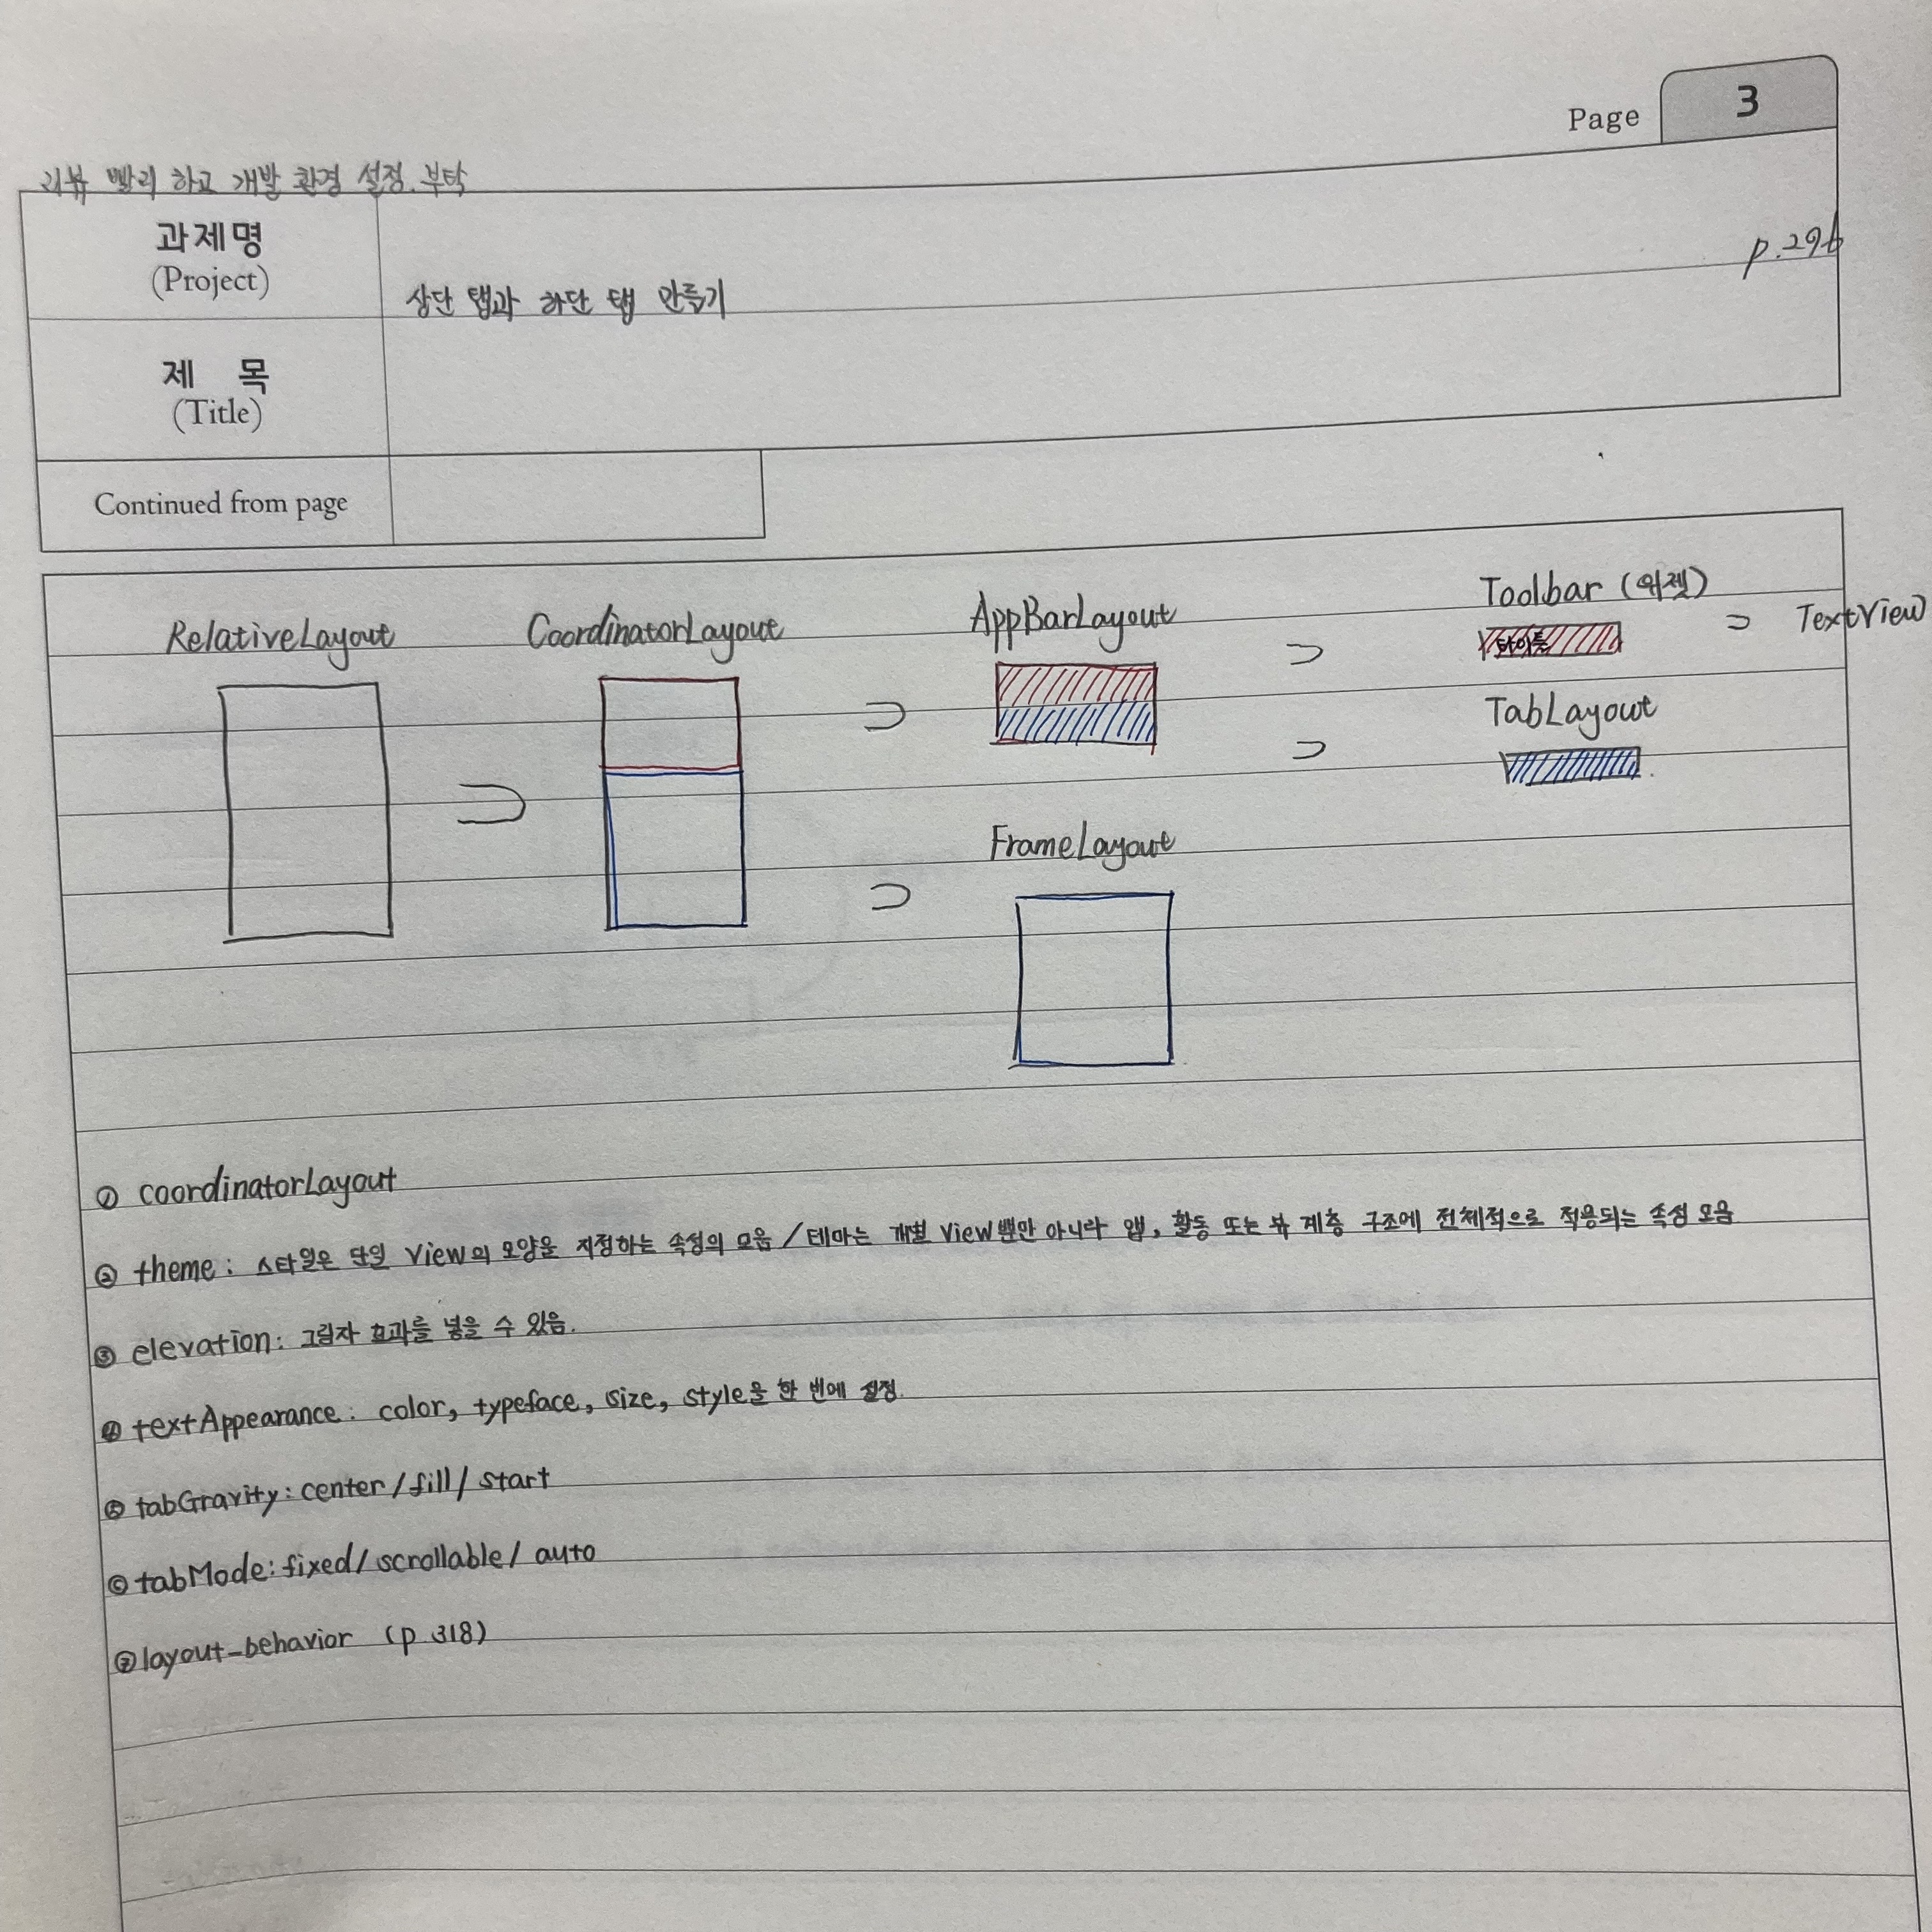
잘 보일 진 모르겠지만, 이해를 돕기 위해 직접 그린 사진도 첨부해두겠다.
-<CoordinateLayout>: 레이아웃 간의 간격이나 위치를 자동으로 결정해주는 레이아웃이다.
-<theme>: <style> 태그는 단일 View의 모양을 지정하는 속성의 모음이라면, <theme> 태그는 개별 View뿐만 아니라 앱, 활동 또는 뷰 계층 구조에 전체적으로 적용되는 속성의 모음이다.
-<elevation>: 그림자 효과를 넣을 수 있다.
-<textAppearance>: color, typeface, size, style을 한 번에 설정할 수 있다.
-<tabGravity>: center / fill / start의 값이 있으며, 탭의 위치를 설정할 수 있다.
-<tabMode>: fixed / scrollable / auto의 값이 있으며, 탭의 모드를 설정할 수 있다.
-<layout_behavior>: 해당 레이아웃이 스크롤 등의 작업이 진행될 때 차지할 면적을 자동으로 계산한다.
직접 만든 액션바의 테마를 적용하기 위해 themes.xml 파일에 지정되어 있는 스타일 속성을 NoActionBar로 변경해야 한다. themes.xml은 app > res > values > themes 폴더에 있다.
▼ 액션바가 없는 스타일로 바꾸기
<resources xmlns:tools="http://schemas.android.com/tools">
    <!-- Base application theme. -->
    <style name="Theme.SampleTab" parent="Theme.MaterialComponents.DayNight.NoActionBar">

    // 중략
그 다음에는 탭으로 사용될 프래그먼트를 세 개 만들어준다. XML 레이아웃뿐만 아니라 소스 코드 파일도 같이 만든다.
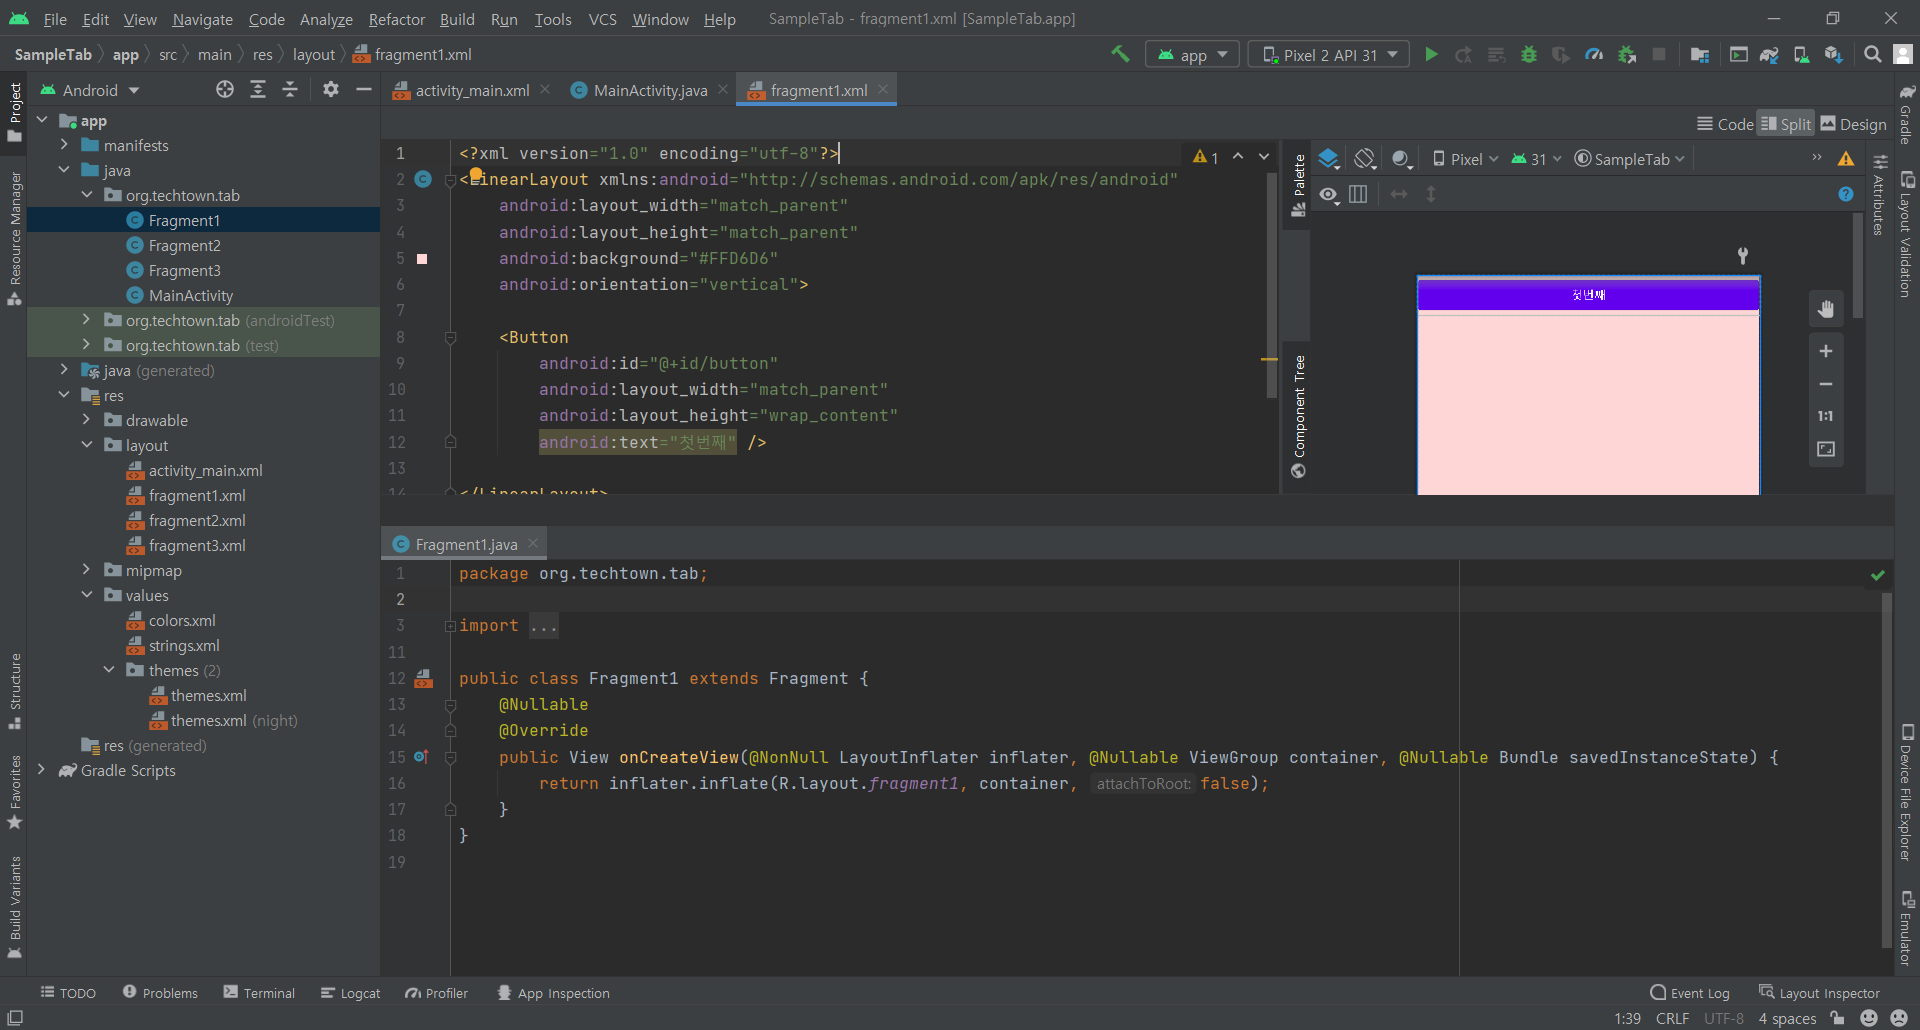
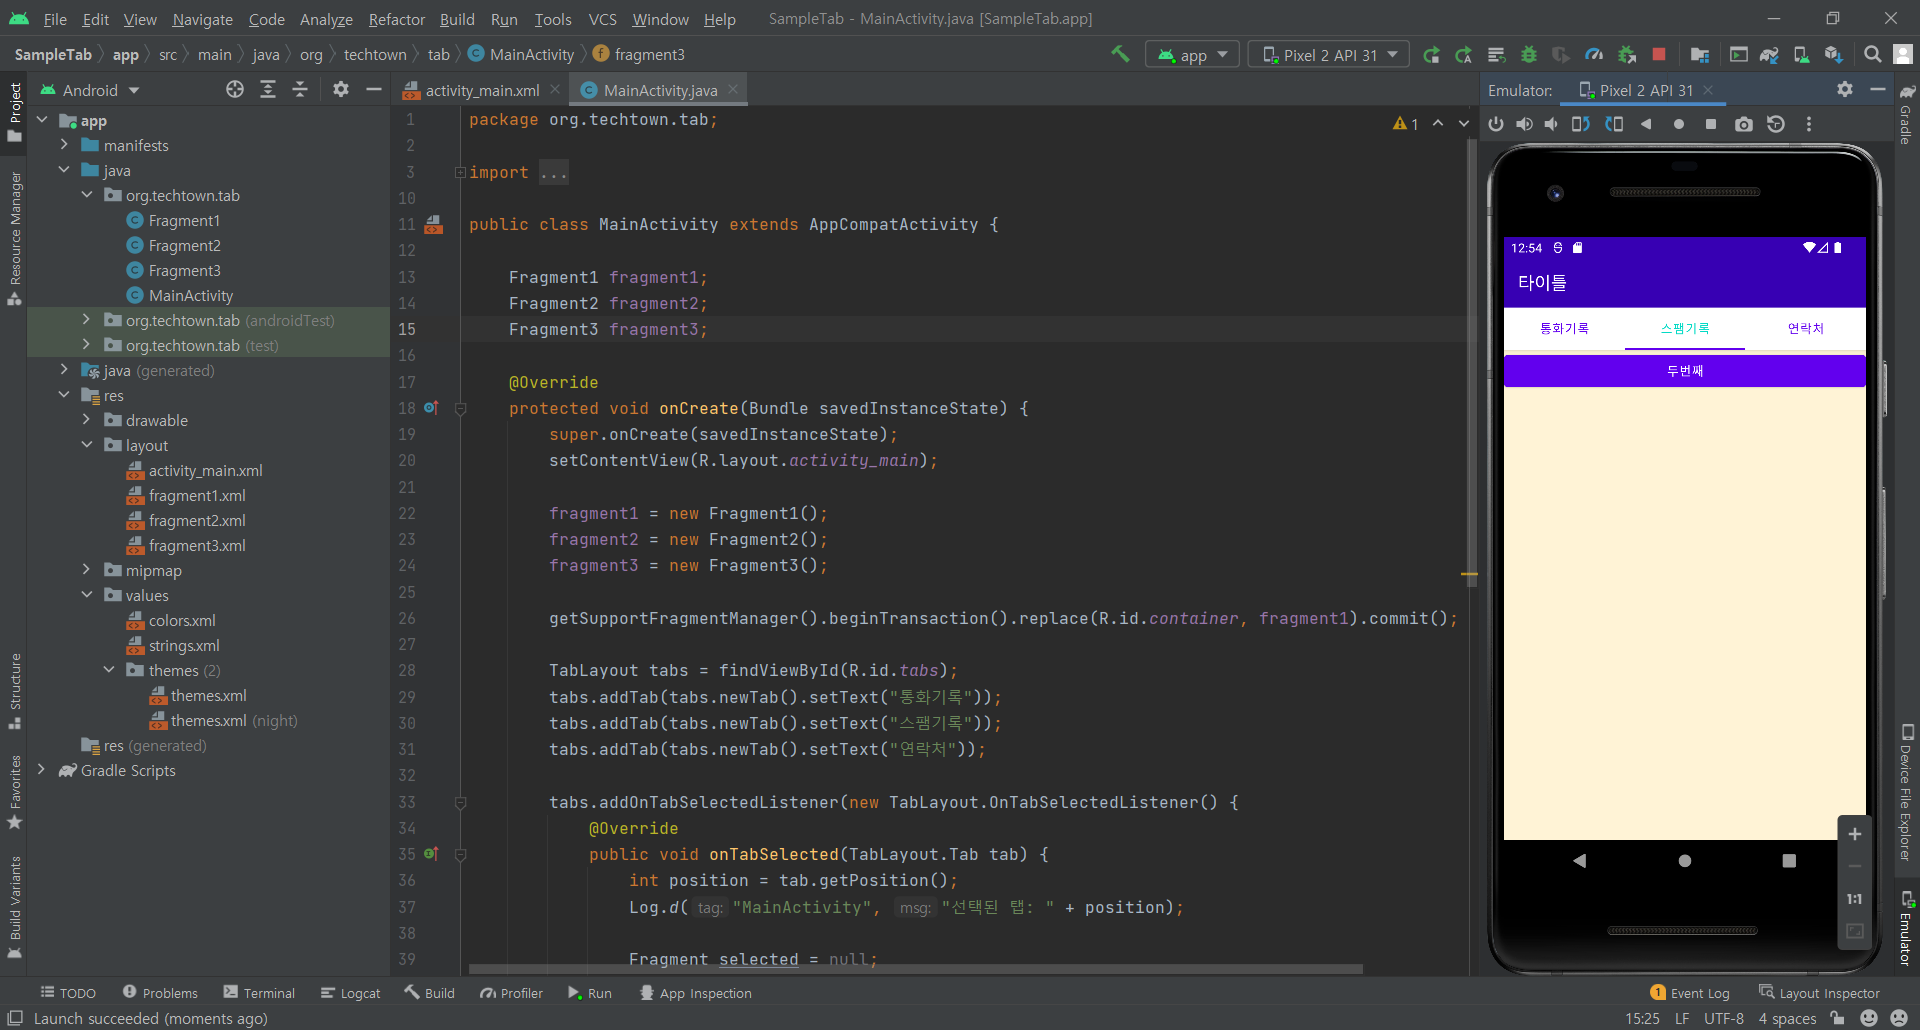
▼ 세 개의 탭 추가하고 탭이 선택되었을 때 보여줄 화면 설정하기
public class MainActivity extends AppCompatActivity {

    Fragment1 fragment1;
    Fragment2 fragment2;
    Fragment3 fragment3;

    @Override
    protected void onCreate(Bundle savedInstanceState) {
        super.onCreate(savedInstanceState);
        setContentView(R.layout.activity_main);

        fragment1 = new Fragment1();
        fragment2 = new Fragment2();
        fragment3 = new Fragment3();

        getSupportFragmentManager().beginTransaction().replace(R.id.container, fragment1).commit();

        TabLayout tabs = findViewById(R.id.tabs);
        tabs.addTab(tabs.newTab().setText("통화기록"));
        tabs.addTab(tabs.newTab().setText("스팸기록"));
        tabs.addTab(tabs.newTab().setText("연락처"));

        tabs.addOnTabSelectedListener(new TabLayout.OnTabSelectedListener() {
            @Override
            public void onTabSelected(TabLayout.Tab tab) {
                int position = tab.getPosition();
                Log.d("MainActivity", "선택된 탭: " + position);

                Fragment selected = null;
                if(position == 0){
                    selected = fragment1;
                } else if(position == 1){
                    selected = fragment2;
                } else {
                    selected = fragment3;
                }

                getSupportFragmentManager().beginTransaction().replace(R.id.container, selected).commit();
            }

            @Override
            public void onTabUnselected(TabLayout.Tab tab) {

            }

            @Override
            public void onTabReselected(TabLayout.Tab tab) {

            }
        });
    }
}
14-2 하단 탭 보여주기
하단 탭은 BottomNavigationView 위젯으로 만들 수 있다. 그 순서는 아래와 같다.
① app > res 폴더에 menu 폴더를 만든다.
② menu 폴더 안에 menu_bottom.xml 파일을 만든다.
③ 메인 액티비티의 XML 레이아웃에 BottomNavigationView 위젯을 추가한다.
④ 위젯의 menu 속성 값으로 menu_bottom.xml 파일을 지정한다.
⑤ 소스 코드에서 탭이 선택되었을 때 보여줄 화면 설정한다.
▼ 하단 탭에 들어갈 메뉴 세 개 추가하기
<?xml version="1.0" encoding="utf-8"?>
<menu xmlns:android="http://schemas.android.com/apk/res/android"
    xmlns:app="http://schemas.android.com/apk/res-auto">

    <item
        android:id="@+id/tab1"
        app:showAsAction="ifRoom"
        android:enabled="true"
        android:icon="@android:drawable/ic_dialog_email"
        android:title="이메일" />

    <item
        android:id="@+id/tab2"
        app:showAsAction="ifRoom"
        android:enabled="true"
        android:icon="@android:drawable/ic_dialog_info"
        android:title="정보" />

    <item
        android:id="@+id/tab3"
        app:showAsAction="ifRoom"
        android:enabled="true"
        android:icon="@android:drawable/ic_dialog_map"
        android:title="위치" />

</menu>
▼ BottomNavigationView 추가하고 menu 속성 값 지정하기
<?xml version="1.0" encoding="utf-8"?>
<androidx.constraintlayout.widget.ConstraintLayout xmlns:android="http://schemas.android.com/apk/res/android"
    xmlns:app="http://schemas.android.com/apk/res-auto"
    xmlns:tools="http://schemas.android.com/tools"
    android:layout_width="match_parent"
    android:layout_height="match_parent"
    tools:context=".MainActivity">

    <FrameLayout
        android:id="@+id/container"
        android:layout_width="match_parent"
        android:layout_height="match_parent"
        app:layout_behavior="@string/appbar_scrolling_view_behavior" />

    <com.google.android.material.bottomnavigation.BottomNavigationView
        android:id="@+id/bottom_navigation"
        android:layout_width="match_parent"
        android:layout_height="wrap_content"
        android:layout_marginEnd="0dp"
        android:layout_marginStart="0dp"
        app:layout_constraintBottom_toBottomOf="parent"
        app:layout_constraintLeft_toLeftOf="parent"
        app:layout_constraintRight_toRightOf="parent"
        app:menu="@menu/menu_bottom" />

</androidx.constraintlayout.widget.ConstraintLayout>
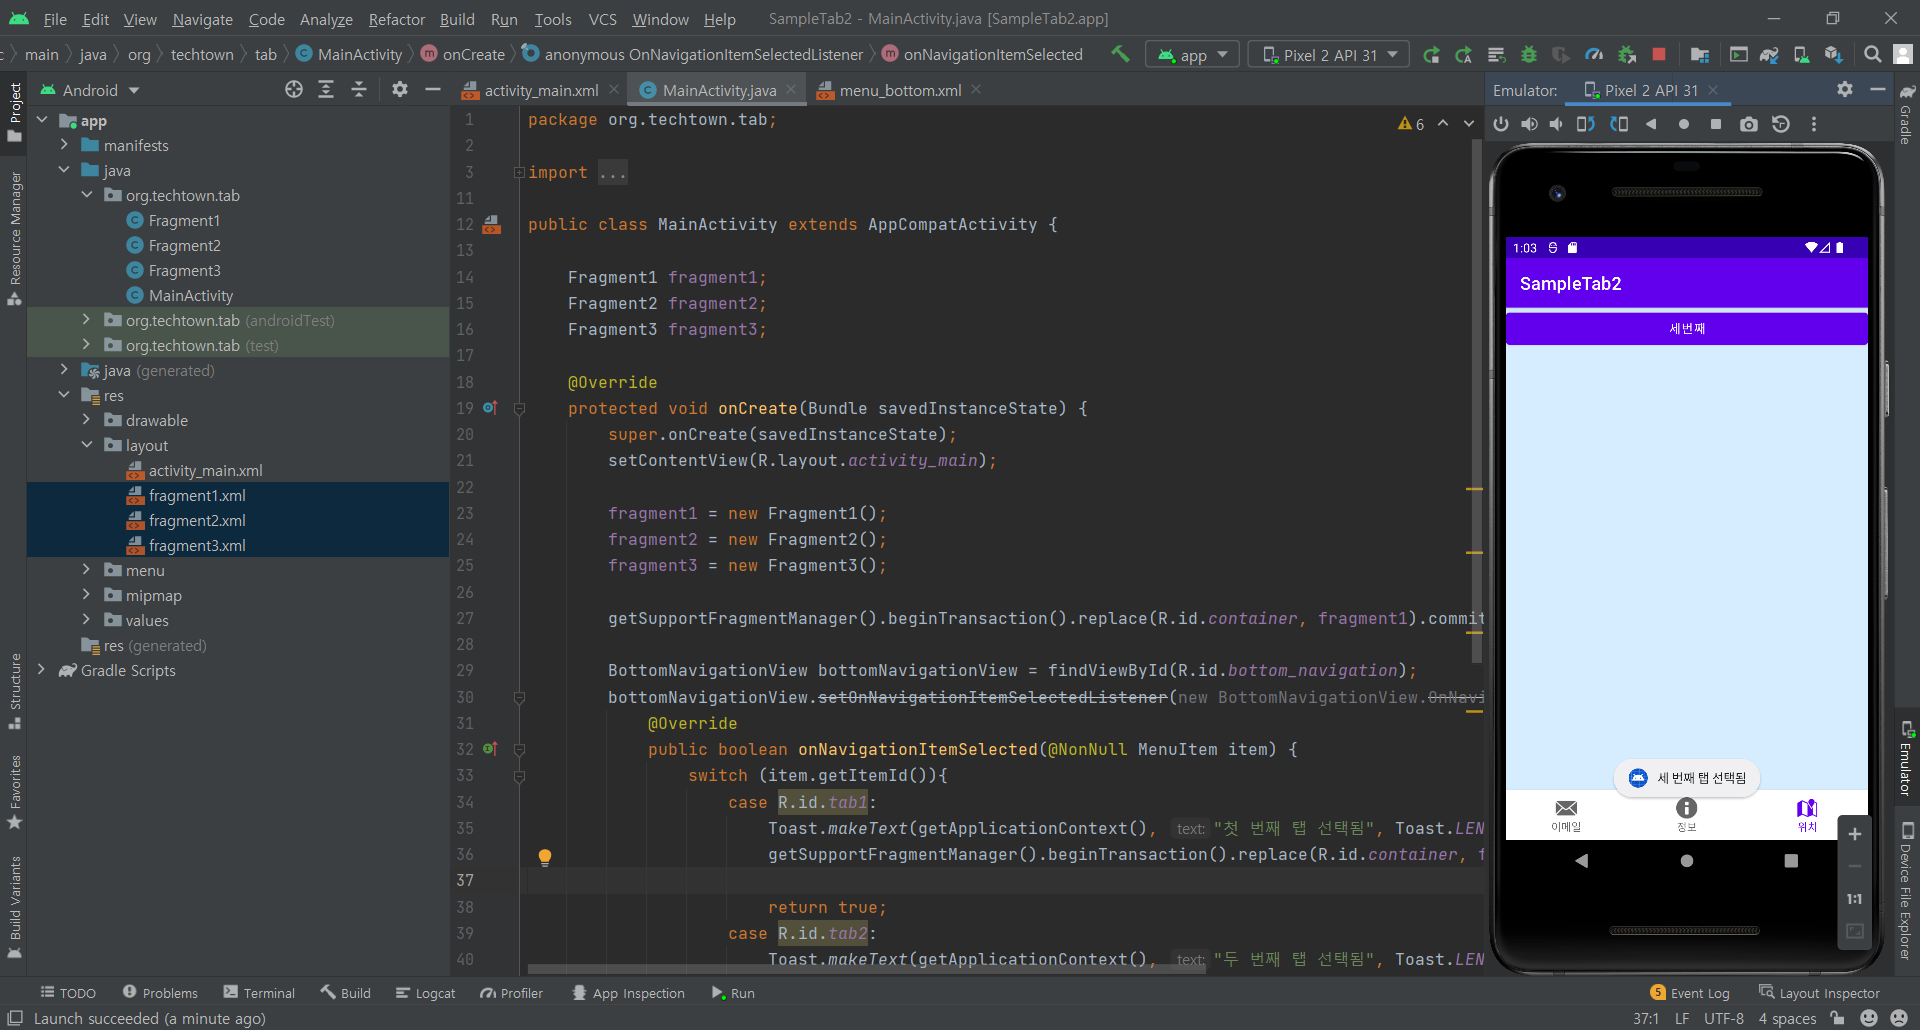
▼ 탭이 선택되었을 때 보여줄 화면 설정하기
public class MainActivity extends AppCompatActivity {

    Fragment1 fragment1;
    Fragment2 fragment2;
    Fragment3 fragment3;

    @Override
    protected void onCreate(Bundle savedInstanceState) {
        super.onCreate(savedInstanceState);
        setContentView(R.layout.activity_main);

        fragment1 = new Fragment1();
        fragment2 = new Fragment2();
        fragment3 = new Fragment3();

        getSupportFragmentManager().beginTransaction().replace(R.id.container, fragment1).commit();

        BottomNavigationView bottomNavigationView = findViewById(R.id.bottom_navigation);
        bottomNavigationView.setOnNavigationItemSelectedListener(new BottomNavigationView.OnNavigationItemSelectedListener() {
            @Override
            public boolean onNavigationItemSelected(@NonNull MenuItem item) {
                switch (item.getItemId()){
                    case R.id.tab1:
                        Toast.makeText(getApplicationContext(), "첫 번째 탭 선택됨", Toast.LENGTH_LONG).show();
                        getSupportFragmentManager().beginTransaction().replace(R.id.container, fragment1).commit();

                        return true;
                    case R.id.tab2:
                        Toast.makeText(getApplicationContext(), "두 번째 탭 선택됨", Toast.LENGTH_LONG).show();
                        getSupportFragmentManager().beginTransaction().replace(R.id.container, fragment2).commit();

                        return true;
                    case R.id.tab3:
                        Toast.makeText(getApplicationContext(), "세 번째 탭 선택됨", Toast.LENGTH_LONG).show();
                        getSupportFragmentManager().beginTransaction().replace(R.id.container, fragment3).commit();

                        return true;
                }
                return false;
            }
        });
    }
}
'Android' 카테고리의 다른 글
| [Do it! 안드로이드 앱 프로그래밍 #16] 바로가기 메뉴 만들기 (0) | 2021.12.19 |
|---|---|
| [Do it! 안드로이드 앱 프로그래밍 #15] 뷰페이저 만들기 (0) | 2021.12.18 |
| [Do it! 안드로이드 앱 프로그래밍 #13] 액션바 사용하기 (0) | 2021.12.05 |
| [Do it! 안드로이드 앱 프로그래밍 #12] 프래그먼트로 화면 만들기 (0) | 2021.12.03 |
| [Do it! 안드로이드 앱 프로그래밍 #11] 프래그먼트란? (0) | 2021.11.28 |